
How to Customize the Windows 10 Start Menu in 2026
Before customizing your Windows 10 Start Menu, ensure your copy of Windows is genuine. Using fake software can lead to security risks. Many users unknowingly install cracked or fake versions. This could make your system vulnerable. You might lose your files, or worse, get hacked. So, always start by checking the authenticity of your system.
Go to Settings > Update & Security > Activation and check the activation status. A fully activated Windows 10 version is real. If it’s not activated, or says “Windows is not genuine,” then you might be using a pirated version. You should also download only from trusted sources. Avoid suspicious websites offering free Windows licenses.
For safe software purchases, use trusted marketplaces only. Always choose Microsoft store or verified resellers. One such safe provider is DigitalSoftwareKey. They offer genuine software with proper licenses. Certified digital keys help you secure your system and get full system features.
Now, let’s learn how to make your Start Menu stylish and useful in Windows 10, step-by-step.
Why Customize the Windows 10 Start Menu?
The Windows 10 Start Menu is central to your computer. Using a default start menu can feel boring. Luckily, Windows 10 allows full menu customization. This means you can design your menu for easier access.
Changing the layout helps improve productivity. For example, you can organize work tools and daily apps neatly. Customization also allows you to create a fresh look. You might even reduce screen clutter. Many people are surprised how much more they use their PC after customizing.
There’s another reason to customize the menu. Default settings often show apps you don’t use. These can crowd your menu. When the menu gets messy, finding tools takes time. Rearranging it saves minutes every day.
You don’t need to be a tech expert either. The process is simple. Windows 10 includes built-in tools to get the job done. Also, if you’re a design lover, the Start Menu gives you a creative outlet.
Ultimately, customizing your Start Menu is about control. You make your computer fit your needs. That’s a small change that has a big effect.
Accessing the Start Menu Settings
Before you make changes, know where the Start Menu settings are located. Click the Start button, then choose Settings. From there, click on Personalization. Now look for Start on the left panel. This is where all Start Menu controls sit.
This menu lets you turn options on or off. You can show recently added apps, most used apps, or suggestions. Each option is a slider button. Tap to enable or disable it. Very simple.
You can choose whether to use the Start Menu in full-screen or small view. You also control folder visibility from here. Many users skip these choices, but exploring them reveals powerful tools.
If you don’t like live tiles or suggestions, switch them off from here. You can also make additional changes by clicking Choose which folders appear on Start.
Once you open this setting area, you’re ready to explore creative options. Everything here is built into Windows 10 – no extra software needed. You simply point, click, and change.
Each small tweak adds up. So it helps to revisit this settings panel often. Make sure the interface reflects your current needs.
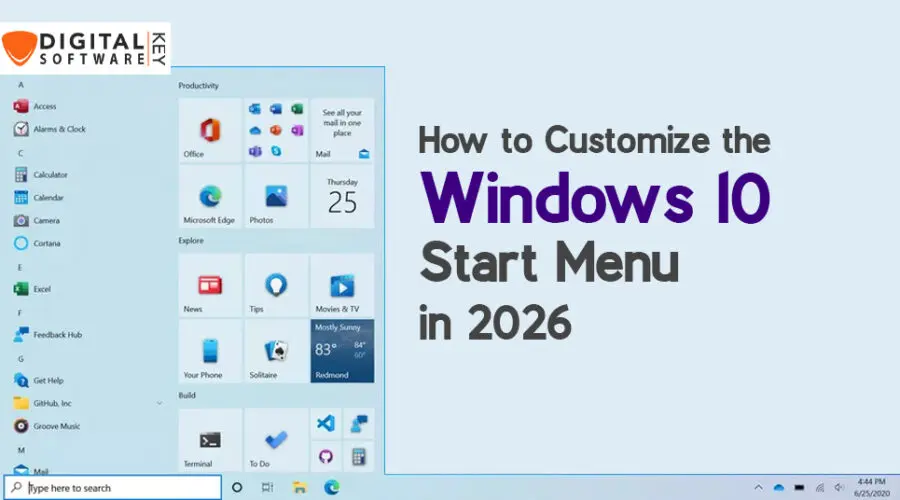
How to Pin and Unpin Tiles
Tiles are the small square or rectangle boxes in the Start Menu. You can place favorite apps or folders here. To pin a tile, right-click any app. Select Pin to Start.
You can pin as many tiles as you want. Don’t worry about filling your screen. Tiles help you avoid searching through menus. Keeping apps one click away saves time.
To remove a tile, right-click and choose Unpin from Start. You can always pin it again later.
Pin folders too. For example, pin Documents or Downloads for quick access. This keeps important items handy. For work, pin tools like Word or Excel. For fun, add games.
Remember, each tile can be customized after you pin them. The Start Menu becomes your dashboard for tasks.
You can arrange pins in any order. Windows 10 remembers your setup even after updates. That gives consistency.
Most people pin apps they use often. Try unpinning default ones you’ve never opened. That way, your menu stays clean.
Custom setups save energy and improve work focus. Play around with it and find what’s best.
Resize Start Menu Tiles with Ease
Once you pin apps to Start Menu, you may want certain tiles larger or smaller. Good news: with Windows 10, resizing tiles is very easy.
Right-click any tile. Then hover over Resize. Here, you will see size options: Small, Medium, Wide, and Large.
Larger tiles are useful for apps you use more. Take Calendar or Mail, for example. For these, a wide view makes sense. Smaller tiles work well for apps you use less. Like Calculator or Paint.
You can mix and match sizes. That adds a nice visual balance to your menu.
Resizing tiles also helps when grouping them. You’ll read more about grouping below. But for now, just know that resizing gives structure.
Experiment with different setups. Test what layout fits your flow. No setting is permanent. You can change the layout any time.
Visual comfort matters too. Larger tiles are easier to tap, which is useful on touchscreen devices.
So, take a few minutes to shape the look of your tiles. Your productivity will thank you.
Organize Tiles into Groups
Besides resizing, you’ll want to group tiles. Creating groups keeps similar apps together. This reduces clutter immediately.
Drag one tile near another. Windows will slide them into a group. You’ll see a light box appear. That’s your group. It forms instantly.
Right above the group, there’s space for a name. Click it. You can type “Office,” “Games,” or whatever fits. Press Enter. Now the group has a title.
You can create multiple groups. Each one serves its own purpose. You control the layout by dragging tiles into different places.
Move them from one group to another if your needs change. Deleting a tile doesn’t remove the app. It just clears space.
Groups help with mental sorting. Your eyes quickly find what you need. It’s easier than hunting through a big list.
Try color matching your tiles within each group. It helps with visual harmony.
Mix and match sizes in groups too. It’s your menu, your way.
Turn Off Live Tiles for Better Appearance
Live Tiles show real-time updates on the menu. News apps, weather, or Mail often use this. Some people find this helpful. Others find it distracting.
Turning them off gives a more clean look.
To turn off live tiles, right-click the tile. Choose More > Turn live tile off.
That’s it. The tile updates will stop showing. You can do this to any tile that supports live features.
For work setups, having fewer animations gives peace of mind. Static tiles load faster and are easy on the eyes.
You can always turn the live tile back on later. So there’s no risk here.
Live tiles use small memory too. Turning them off may slightly improve performance.
Also, some live tiles can display unnecessary news or ads. Removing them cleans your workspace.
Take a few minutes and go tile by tile. Test which ones are useful. Remove what you don’t need. It’s all part of building an efficient menu.
Change the Start Menu Color and Theme
Windows 10 offers color settings for better personalization.
First, you’ll choose between Light, Dark, or Custom themes. Dark mode is easier on eyes for many users. Choose Custom if you want more control.
Next, scroll down and enable Start, taskbar, and action center color changes.
Pick your brand’s color, or something that soothes the eyes. Try blue, gray, or green. Avoid bright reds or yellows. They can be intense and tiring.
This setting also applies to the Taskbar. So the complete look remains unified. Your desktop feels custom-made.
You can preview changes before exiting. Keep testing until you find one that looks right.
Also, try enabling Transparency effects. This adds modern feel to your menu.
Theme and color don’t boost performance. But they matter for experience. You’ll enjoy using your PC more.
Small visuals can boost mood. Try it for a week. You’ll likely never want to go back to default again.
Add Most Used Apps Easily
Working often involves repeating tasks. The Start Menu can list your most used apps for fast access.
This feature is built-in. Go to Settings > Personalization > Start. Then turn Show most used apps to ON.
Your five or six top used apps will now show up automatically. This list updates as usage changes.
It’s great when switching projects. As you change tools, this section adapts.
You don’t have to pin those apps unless you want quick one-click access.
This feature saves time and makes your menu smarter. There’s no learning needed. Windows 10 does the work in the background.
Many users overlook this feature. But it gets more useful over time. Just keep using your apps as normal.
Combine this with manual tiles and you have a balanced menu system: fixed tools on top, smart suggestions below.
Small changes like these give big returns. Especially when working long hours.
Use Folders in Start Menu
Folders are another powerful feature in Windows 10 Start Menu. They help keep the menu tidy.
To create a folder, just drag one tile on top of another. That’s it. Windows creates a folder automatically.
You can name the folder. For example, make one for “Work Tools” or “Games.” Add multiple tiles inside.
Click on the folder to open it. Inside, your apps are present in mini-form. It saves space on your Start Menu.
This layout is neat for smaller screens like laptops or tablets.
Want to remove a folder? Drag tiles out of it till it’s empty. The folder disappears.
Folders bring structure and reduce mess. Especially useful if you have many apps.
Organize them by task: Editing, Communication, Utilities. This saves time daily.
It also adds charm to your overall desktop. So, take time to explore folder creation.
Enable or Disable Full-Screen Start Menu
Some users like large Start Menus. Others prefer compact ones.
You can choose between both. Go to Settings > Personalization > Start. Turn Use Start full screen ON or OFF.
Full-screen mode gives a similar feel to tablet menus. You see more apps at once.
Perfect for users who want simple navigation. Or for touch devices.
Compact mode keeps everything small. Saves space and hides unwanted items.
This choice depends on your comfort. Try both. Stick with what feels better.
Personalize App List Visibility
In Windows 10, the Start Menu shows a long app list. You might not need it showing always.
To hide the app list, go to Settings > Personalization > Start. Turn OFF Show app list in Start menu.
Now, only your pinned tiles or folders show. To see the app list, click All apps when needed.
Some users want a clean Start Menu. This setting helps.
Minimal menus feel less cluttered. It’s a tiny change that matters.
Customize the list settings as you wish. Start Menu becomes easier to browse.
Resetting Start Menu to Default
Sometimes you try too many things. It’s okay. You can always reset the Start Menu.
Open Windows PowerShell (Admin). Run this code:
Get-AppXPackage -AllUsers | Foreach {Add-AppxPackage -DisableDevelopmentMode -Register "$($_.InstallLocation)\AppXManifest.xml"}This will restore default settings.
Use this command when layout gets messy. Or after removing too many apps.
Make sure you backup tiles layout if needed.
Resetting gives a fresh start. From here, you can build new groups and tiles.
Use Third-Party Tools to Deep Customize
For advanced users, some tools help more. Try StartIsBack, OpenShell, or Stardock Start10.
These apps give more control. You can make the Start Menu look like earlier Windows versions.
You add animations, transparency, or classic looks.
They’re easy to use. But use them only if Windows settings aren’t enough.
Always download these from official websites or Windows 10
Avoid shady tools that come with malware.
Deep customization makes Start Menu truly yours. But be sure you still maintain security updates.
Buy Genuine Windows from DigitalSoftwareKey
All these options work best on genuine systems. If your Windows 10 isn’t activated, you may face limits.
Don’t wait. Get a licensed copy today from DigitalSoftwareKey.
They offer affordable and real Windows 10 keys. You receive activation right after payment.
Buying from reliable sellers ensures safety. It also lets you receive full updates. That’s key for long-term system health.
Avoid cracked software. They harm performance and data safety.
FAQs
1. How do I add apps to my Windows 10 Start Menu?
Right-click any app, then choose “Pin to Start.” It appears as a tile on your menu.
2. Can I change tile sizes in the Windows 10 Start Menu?
Yes, right-click a tile, select “Resize,” and pick from Small, Medium, Wide, or Large sizes.
3. Why should I group tiles in Windows 10?
Grouping helps organize apps by type or task. It makes your Start Menu cleaner and easier to Windows 10
4. What does a genuine Windows 10 offer?
It offers full features, latest updates, and better security. Avoid using fake versions for safety.
5. Is full-screen Start Menu better?
It depends. Use full-screen if you prefer touch interface or large layout. Compact works well for desktop users.
Conclusion
Customizing the Windows 10 Start Menu in 2026 is simple, yet powerful. You don’t need advanced skills or tools. With built-in settings, you shape your digital space. It brings order, speed, and a personal touch. Use tiles, themes, and folders wisely. Over time, you’ll find new ways to arrange your menu.
Whether for work or personal use, creating the perfect Start Menu boosts focus. Keep things clean. Only show what you need. Combine built-in features with third-party tools for more creativity. Most importantly, always use genuine software.
Start today and shape your Windows 10 Start Menu to truly reflect your day-to-day needs.
Explore top-quality Windows licenses and upgrade with trust from DigitalSoftwareKey. Here’s to smarter, safer, and more beautiful computing!


10 thoughts on “How to Customize the Windows 10 Start Menu in 2026”
Comments are closed.